
Here’s what you need to gather:
Plastic candy canes
Strips of fabric 1" x 44" in red and white (the amount varies as to how
Closely you overlap while wrapping. Have several strips!!)
White glue
Water
Protective wear (This gets really messy….wear old clothes and
Gloves and cover all work surfaces)
Sand paper
Old scissors (These too will get messy….probably should not
Use your best pair!!)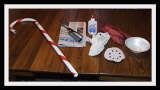
You should probably read through the entire tutorial first! Then, gather your supplies and get ready to have a ball!! This is quite easy, and a whole lot ‘a fun….this would be a great family project with the kids, or as a craft project at those various clubs!! Once they are completed, you’ll find one million and one ways to decorate with ‘em!!
Alrighty then……let’s get started:
Step #1 Cover your work area well!!!
This project gets VERY messy, so be sure to wear old clothing,
Perhaps gloves, and be especially sure to cover your entire work area!
Step #2 Prepare those plastic candy canes!!
Remove as much of the packaging as possible. Mine came with a yard
Stake taped to it, as well as price stickers. Peel off as much as you
Can, and then lightly sand the entire cane. Wipe with a dry paper
Towel. >
>
Step #3 Prepare your goop!!
Mix 1 part white glue to 1 part water in a disposable container. Pay
Caution and leave enough room in the container for dunking!!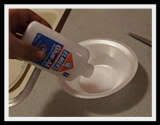
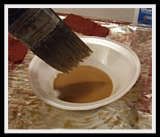
Step #4 Preparing the fabric.!
Preparing only one piece at a time, start with a white fabric strip.!
Dunk it into the goop mixture, and wring out the excess liquid. !
Unwrap the fabric strip ensuring it is flat and untangled. I rip
My fabric strips leaving strings…this can be a problem later on, so
Remove as many strings as possible.!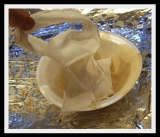
Step #5 Let’s begin wrapping!!!
Starting at either end, lay your cane horizontal to you while placing
The fabric strip vertical and under the end of the cane. !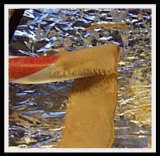
Fold the fabric over the end of the cane and then tuck excess fabric back onto itself. !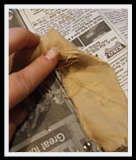
Holding the fabric very taught, begin wrapping the cane covering the fold. !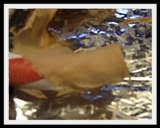
Continue to the opposite end overlapping each edge. !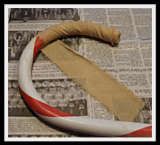
Once you have reached the end, leave a "tail" of fabric and repeat the fold as above to cover the end.!
You may have enough "tail" to wrap back up the cane a bit. Simply snip off the excess. Some folds are better than others!! If necessary, hot melt glue the ends to hold them tight!
Tip: You must keep the fabric taught to the cane for a smooth finish!! If necessary, unwrap and begin again!!
Should you come to the end of your strip before reaching the end of the cane, simply add another goop dipped white strip to finish off the cane…overlap the ends and you’ll never see it!!!
Step #6 Adding the red stripe.
Using a red fabric strip, dunk into the goop. Again, wring out the excess liquid and make sure fabric is flat and untangled. Beginning
At either end, wrap the red strip on top of the white, leaving gaps….!
Do not overlap the red. Sometimes the ends do not seal down…hot
Melt glue the edges to secure them.!
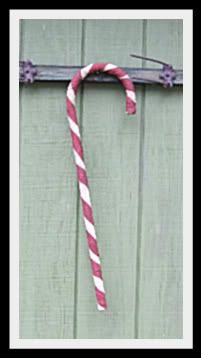
Step #7 Let it dry!!!
Hang your completed cane to dry completely. These do not dry well lying flat….they really should be hung! Clean up your work surface and tools while everything is still wet…..this is a much more
Difficult job if allowed to dry!!!!!!
Tip: These are NOT weather proof!!! They can be used on covered porches or patios, but can not withstand full weather!!!!!
!
Have a great time decorating with these!!! They are quite fun to make…..and quite fun to share!!!!